Tuesday, 15 January 2013

Strawberry Yoghurt....A Sweet,Healthy Dessert....!!!

Strawberry Yoghurt..!! A Sweet,Healthy Dessert...!!


It has been proved many times that few preparations,made with very less efforts sastisfy our taste bud more than some preparations made with a tough process.Though it's not necessarily true all the time.
Two or three days ago,I prepared a sweet dessert with two or three very easy steps and that preparation really made us so happy.Specially my litttle one,praised me fully.


Delicious and nutrition-rich red colored strawberries are among the most popular berries. Native to Europe, however, nowadays the  berries are widely cultivated as an important commercial crop in many temperate regions all over the world.This fruit is very low in Saturated Fat, Cholesterol and Sodium. It is also a good source of Folate and Potassium, and a very good source of Dietary Fiber, Vitamin C and Manganese.

Botanically, the plant is a runner (creeper), belongs to the family of Rosaceae, of the genus: Fragaria.( Though I was a student of Zoology,I have a very little knowledge in Botany too,though Botany is just a horrible subject to me ,and all the time I used to search my books for informations. :P :P )

In my home,there is a strawberry addict ...;) :D.Actually my little one loves this fruit like anything.In the morning,at breakfast table,she wants her conflakes garnished with raisins and lots of chopped strawberry and in the similar way,she loves her fruit salad,icecream with this fruit.

In Mumbai,strawberries are mostly available in huge amount during winter season.So,I was thinking since few days,other than eating the fruits in this way,we could use it in some other way too.Therefore,I prepared Strawberry Souffle(recipe will be given soon) ,strawberry milk shakes,cup cakes using crushed strawberries,Then I prepared this strawberry yoghurt and believe me,it was just heavenly.

The recipe is very simple and consists of only two three steps.

Ingredients:

  • Strawberry:10-12 pieces(chopped finely)
  • Hung youghurt:2 cups
  • Powdered Sugar:1/2 cup
  • Vanilla Ice-cream:200 ml.

Process:

  • Hung yogurt is made from hanging yogurt tied ,in a cheesecloth and draining the liquid out of it.I want to add that hung or creamy yoghurt, as it is healthier than the normal yoghurt.


                                                             Hung Yoghurt

  • I placed about 500gm of  yoghurt in a squared shaped muslin cloth and tied the four corners of the cloth tight and hanged it overnight under my kitchen tap and in the next day morning when I untied the cloth I found the creamy, nice, thick and waterless yoghurt.


                       (I should have chopped My Strawberries more finely.)


  •  Now in a mixing bowl add the hung yoghurt,powdered sugar and the        vanilla ice cream and mix them very well.
  • Then add some finely chopped strawberries with it and mix again.
  • Now your strawberry yoghurt is ready.
  • Serve it garnished with few more finely chopped strawberry.
  • Believe me,the taste is not less than the store bought strawberry yoghurt.
  • Serve this at your breafast table  or as dessert after dinner or lunch.


                            Enjoy Your Food...!!!!
 

Thursday, 10 January 2013

Apple Pie...!!!!!


To be very frank and honest, I am just a novice in the field of baking.But  I have a huge interest in this and I want to improve my baking skills. More than once,I have prepared very simple chocolate and vanilla cakes,at my home but never had enough confidence to make  pie ,muffins etc. etc.When last time I was successful in making banana muffines(inspired by one of my sweetest sis,Payel),in my first attempt,I wanted to take a chance to prepare something different again.

I always used to keep an eye on magazines,news papers,different cooking shows and ofcourse in various cooking groups of facebook for good recipes.Few days ago, I read a very simple and easy apple pie  recipe in a magazine and following that only ,I prepared this yesterday at my home and nevertheless to tell that it turned out really delicious.Today I became quite confident about its yummilicious taste when I saw my daughter, for the first time, has completely finished her tiffin at school.And guess what I have given her for today's tiffin ???    ...Yessss,it was the Apple Pie,I prepared yesterday.


Here is the recipe:

Ingredients:


  • 1 1/2 cup cake flour(all purpose flour),
  • 1 1/2 teaspoon baking powder
  • 1/4teaspoon  salt                                                                                                                                         
  • 1 cup sugar                                                                                                                         
  • 1/2 teaspoon vanilla extract (optional)
  •  100gm Butter (Melted)
  • 50 ml Full Cream Milk
  • 100ml Water
  • 2-3 Apples
  • 2-4 tbsp Lime Juice
  • Sugar for sprinkling.
 
 
Directions:


  • Preheat Your oven at 180 degree celcius for 10 mins.
  • Wash Apples,peel and cut 2/3 rd of them in thin slices and mix with lime juice.
  • Cut remaining apples into cubes.
  • Mix the all purpose flour,baking powder,salt,sugar,vanilla extract,melted butter),milk,water and the apple cubes.
  • Mix them until a smooth batter is formed.
  • Now grease and flour a baking pan or tray and pour the batter in it.
  • Put the apple silces fan shaped on the batter.
  • Bake it 180 degree celcius until a tooth pick ,inserted into the centre ,comes out clean.Normally it takes 50-60 mins to bake completely.
  • After baking brush cake sparingly with melted butter and sprinkle with sugar granules.


Here I want to mention one thing,if you want apple crumble, after making the batter and greasing your pan,knead  100gm flour,50 gm sugar ,2-3 drops of vanilla essence and 1 pinch of cinnamon powder till crumbles are formed .Sprinkle crumbles on the top and bake.( I didnt do this step).


                                        Enjoy Your Food....!!!!


Monday, 7 January 2013

Hariyali Chicken Tikka...Murg Tikka Kebab Hariyalli.....!!

                      Hariyalli Chicken Tikka .....!!! Murg Tikka Kebab Hariyalli.....!!!


Kebab' s and Tikka' s are the traditional Indian recipes for grilling                  chicken.Marination is the most important step of this preparation.The rich  marinade gives the boneless pieces of chicken breast a lots of flavour.
 
  Hariyalli Chicken Tikka Kebab or Murgh Tikka Kebab Hariyalli are famous as starters or appetizers in restaurants,specially in Punjabi Dhabas.The boneless small chicken pieces are perfectly coated with mint and coriander paste and are grilled in fire.The mint and coriander paste give it a beautiful greenish color and a wonderful flavour.

Actually it was our one of the most favourite appetizers and used to order it very frequently in our favourite restaurant,when we were in Kolkata.But ,here,in Mumbai,we were missing this beautiful preparation very much and therefore I was looking for the recipe since a long time.

In the meanwhile,we went for a long drive and while we are returning home,visited a village fair beside the highway and there I found a beautiful and very interesting tandoor kit.Immediately I bought that.


The kit actually consists of a circular shape copper wire,4 iron skewers and a iron stand.The copper wire and the iron stand should be placed on the flame of a gas burner and  the iron stand helps to hold the skewers.In this way,the flame is used in such a way,so that the smoky flavour of the tandoor can easily come out.

Since that day,I was eagerly waiting to use it and then I found a good recipe of this preparion after a prolonged internet surfing.Mainly I followed the recipe with little variation which I found in a blog.

Using my new Tandoor kit I grilled my marinated chicken pieces .

This Chicken Hariyali Tikka Kebab made our last Sunday evening (which was declared as the coldest day of this season,rather coldest day in last 44 years in Mumbai) super-special with a glass of red wine.

Here is the recipe:

                        
Ingredients:

  • Chicken Breast:250 gms,cut in small cubes.
  • Skewers
  • Grilling tool.

For the marinade:


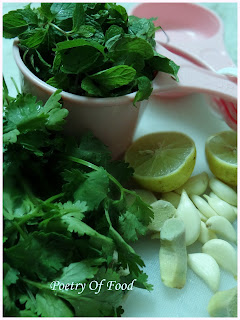
  • cup chopped fresh cilantro/coriander leaves and tender stems .
  • 1/4 cup fresh mint leaves and tender stems
  • 5-6 cloves of garlic .
  • 1.5″ piece of fresh ginger root .
  • 1-2 fresh green chilli (amount may be increased or decreased) .
  • 1 teaspoon cumin seed .
  • 1/2 spoon cinnamon powder
  • 2-4 cloves
  • 1 teaspoon red chilli powder
  • 2 tablespoons lemon juice
  • 2 tablespoons thick yogurt
  • 1 tablespoon oil or ghee
  • Salt


Preparation:

  • Clean, wash and pat dry the chicken pieces.
  • Grind/Blend all the ingredients of the marinade into a paste. Do not add any extra water. The lemon juice and the yogurt should be enough to create a perfect paste.


  • Mix the chicken with the marinade very well and put it in a zipper bag and refrigerate it  for at least 3 hours.But for this overnight  marination is better.I marinated only for 4-5 hours and it was extremely soft and tasty.
  • One thing I should mention that If you are using bamboo skewers soak them in water for half an hour to prevent them from burning in the heat of the grill but mine was iron skew and so I didnt need this process.


  • Now,carefully pierce the skewers through the chicken morsels.
  • There should be about 5-6chicekn pieces in each skewer. 
  •  Brush them lightly with oil.


  • Cook on the grill/ tandoor for about 7-10 minutes or until done.

But If you want to Bake,

  1. Heat oven to about 350- 400 degree F or 180-200 degree celcus.
  2. Place the skewers tray and bake in the pre-heated oven for 15-20 minutes or until the juice runs out dry and the chicken is done, turning them around in between.
Tikka' s can be made on the stove  top also:

  1. Take a thick bottomed flat skillet or a stove top griddle/grill 
  2. Coat it with oil and cook the chicken.
  3.  Turning them around midwhile and basting them with more marinade if you wish till done.
  4.  It should be cooked by the end of 12-15 minutes.

While you are grilling or baking, make sure not to overcook as it will tend to dry off the chicken bites pretty quick. They need to be tender, cooked and succulent.
Serve with chutney or yogurt or any other sauce and salad of your choice.
I served mine with green chutney made up of mint and coriander leaves and simple salad.


                                                       Enjoy Your Food.....!!!

Friday, 4 January 2013

Dhokar Dalna......!!!A Complete Veg Bong Delicacy....!!!

Dhokar Dalna.....................!!! A Complete Veg Bong Delicacy............!!!


Bengali cuisine is a culinary style,originating in Bengal,a region in the eastern part of the Indian Subcontinent,which is now divided into West Bengal and Bangladesh.Bengali cuisine are famous for its subtle flavours and its huge spread of confectionaries and dessert.

Dhokar Dalna is one of the most famous complete veg bengali food.But since my chinldhood,I am in a big confusion that why such a beautiful dish is given this peculiar name,"Dhokar Dalna".The bengali word,'Dhoka' means "to cheat".I really dont have any idea,why the lightly spiced fried lentil cakes(Dhoka) are given this particular name.

However,I have learned this recipe from my mother. In this preparation she used to simmer the lightly spiced golden fried Dhokas or lentil cakes in a gravy made with ginger -cumin paste and coconut milk.

Here is the recipe:

 Ingredients:

  • Chana dal/Bengal gram:1 cup(soaked overnight in water)
  • Potato:2 large(cut into big cubes)
  • Cumin(1 tsp)+ Ginger(1 inch)+ Red dry chilli(1/2) Paste:1 tbsp
  • Dry roasted cumin powder:1 tsp
  • Cumin seeds:1 tsp
  • Red chilli powder:1/2 tsp(or as per taste)
  • Salt:As per taste
  • Sugar: 1/2 tsp
  • Bay leaves:1/2
  • Cinnamon stick:1
  • Turmeric Powder:1/2 tsp
  • Garam Masala powder:1/2 tsp
  • Oil(I used mustard oil for cooking and white oil for frying dhoka)
  • Ghee:1-2 tsp
  • Coconut Milk:1 cup
  • Water:1/2 cup.


Process:

  • Wash and soak Bengal gram lentils in water overnight or for 4-6 hours.
  •  Drain water and grind the dal to a paste in a mixer.
  • Heat 1 tspoon oil and temper it with 1/2 tsp cumin seeds. 
  • Pour the ground dal and add salt,pinch of sugar,dry roasted cumin powder,chilli powder, and mix well.
  • cook till the mixture is soft and sticky, but not completely dry.


  • Now smear little oil in a dish. Pour the cooked dal and spread evenly on the dish.
  •  Press lightly with a spoon so that it sets properly.
  • Cool and cut the dhoka into square or diamond shapes with the help of a knife.
  • Now,heat two tbsp white oil  in a pan and fry the dhokas until light brown.
  •  Remove and keep  them aside.


  • In the same pan now fry the potato cubes with little salt and turmeric powder until golden brown and keep them aside too.


  • Now Take an another deep bottom vessel.
  • Heat 2-4 tbsp mustard oil and add little cumin seeds,bay leaves, one red dry chilli and the cinnamon stick.
  • When the cumin seeds start to splutter and beautiful odour releases add the cumin-ginger-chilli paste.
  • Cook few minutes and then add  turmeric powder and salt.
  • When the mixture starts to release oil add the fried potato.
  • Mix them well and add water.
  • Cover and Cook until the potato cubes become soft and tender.
  • Now add the coconut milk.
  • Bring it to boil.
  • Now add the fried dhokas.
  • In a medium flame cook until desired consistency .
  • Carefully cook after adding dhokas to the gravy so that the dhokas reman intact after cooking.
  • Turn off the gas and add little ghee and sprinkle garam masala powder on it.


  • Serve with hot rice and believe me,it's heavenly delicious.
                                  Enjoy Your Food.......!!!

Thursday, 13 December 2012

Rui Tomato Posto...!!! Rohu Fish in Poppy Seed Paste & Tomato...!!!


Rice and Fish are the soul foods of Bengal. A Bengali meal is never complete without fish and rice.That's why there is a famous saying for the bengali people....."Mache bhate bangali".."Fish and rice make a bengali".

I learned this recipe from my mother.It's very simple and easy to prepare, where the slightly fried rohu fish pieces are cooked in poppy seed paste and tomato.

Here is the recipe:

Ingredients:


  • Rohu/Katla fish pieces:4
  • Poppy seed paste:4 tbsp
  • Tomato:2(thinely chopped)
  • Mustard oil:4-5 tbsp
  • Kalonji(Nigella seeds):1/2 tsp
  • Turmeric Powder:1/2 tsp
  • Salt:As per taste
  • Green chilli:2-3(or as much you want)
  • Water:1cup


Process:
  • Wash the rohu fish piecess and marinate them with little salt and turmeric powder and 1 tbsp of oil for 2-4 minutes.
  • Heat oil in a pan and slightly fry the fish and keep them aside.
  • Dont use the same fried oil for cooking as it can turn the color of the curry blackish.
  • So,heat some fresh oil in an another pan and add the nigella seeds and 2 green chillis.
  • When the seeds start to splutter add the chopped tomato.
  • When the tomatoes become soft and pulpy add the poppy seed paste and mix well.
  • Add little turmeric powder and salt.
  • After few minutes add the water.
  • Now when the gravy starts to boil add the fried pieces of fish.
  • Cook them until your desired consistancy.
  • Turn off the gas.
  • Add 2 green chillis and sprinkle little mustard oil on the curry.
  • Serve hot with steaming hot rice.


                                                                                                   Enjoy Your Food...!!!

Monday, 5 November 2012

C3...Capsicum Curd Chicken....!!!!


It was a Sunday morning and I was down with severe cough and cold.So,this time,not olny the breakfast but also my hubby dear prepared an awesome lunch for us with a lovely chicken item.The chicken was so good in taste that I just cant restrict myself from sharing it with all of you.

He has given a beautiful name of this item as well.C3,Capsicum Curd Chicken.

Here is the recipe:

Ingredients:


  • Chicken:500gm
  • Capsicum:3 large
  • Curd:5-6 tbsp
  • Onion:3 large
  • Tomato:1(chopped),optional
  • Ginger paste:2 tsp
  • Garlic:5-6 cloves chopped
  • Masturd oil
  • Turmeric powder:1tsp
  • Chilli powder:1/2 tsp
  • Salt :As per taste
  • sugar: 1/2 tsp
  • Water:1cup
  • Garam masala powder: 1/2tsp

Procedure:

  •  At first chop one capsicum very finely and dice the other two.
  • Make  a smooth paste of 2 of the 3 onions and thinely slice the other one.
  • Take the chicken,wash it and with a tissue paper dry up the extra water.
  • Now in a large bowl add the chicken,3 tbsp masturd oil,sliced onion,finely chopped capsicum,chilli powder  and mix very well.
  • Put the marinated chicken mixture in refrigerator and keep it for 1 hr.
  • Then add the rest of the mustard oil in a deep bottom vessel.
  • Add sugar,fry it till brown .
  • Then add garlic paste,chopped tomato and cook them until the tomato becomes soft.
  • Add the onion paste and stir it for few minutes.
  • Now it's time for the chopped capsicum. Add them and fry them little in low flame.
  • Then add the temeric powder.
  • Add the ginger paste and cook it low flame until the oil separes from the mixture.
  • Now add the marinated chicken pieces.
  • Add salt with it.
  • Cook very well in low flame until the chicken pieces become soft and tender.
  • As curd is already there in the marinated chicken ,huge amount of water will release and it will help to cook the chicken and so be careful while adding extra water.If you want to prepare your chicken in little dry form ,you need not to add water.
  • When it comes to your desied consistancy sprinkle little garam masala powder.
  • Serve with hot steaming rice.